42 how to fill gaps in crown molding
How to Caulk Baseboard Gaps - The Spruce 25.06.2022 · Gaps between the bottom of the baseboard and the floor usually occur because floor joists sag and foundations settle over many years. In some cases, these gaps are wide enough that they allow air infiltration and can seriously impact your home's energy consumption. A bead of caulk applied at this joint is an easy way to block such air gaps. S20 E35: Crown Molding, Future of Solar - This Old House For a better solution, Tom shows Kevin how to wrap the molding around the angled wall and close off the gap by creating a custom angled filler piece. First, Tom uses a piece of scrap and transfers the wall's angle to create a guide. He then uses the angle to adjust the saw blade before cutting the perfectly-fit filler piece under the molding.
How to Fix Common Issues With Trim and Moldings - Angi When your trim or crown moldings come loose, look for gaps. Apply new caulk to the area with a caulk gun to help seal these edges and make your home look better. If you're really in the mood, you can paint after it dries. One of the best ways to paint trim is to make sure the caulk is dry and even before adding new paint.

How to fill gaps in crown molding
How to Fill a Gap Between a Baseboard and Tile Floor Add the quarter-round molding to the front of the gap to fill it and provide extra detail to the molding. You will not need to replace the existing base with this method. Cut the proper length using a miter saw, then finish it and nail it to your baseboard. › blog › how-to-fill-large-gaps-inHow to Fill Large Gaps in Wood Trim: 7-Step Repair Guide Run your finger along the layer of caulk and gently press to smooth the caulk into the gap. This will help the caulk adhere to the surface and create a neat, clean look. After smoothing the bead, clean off any excess caulk on either side of the gap before it dries. If you used painter's tape, remove the tape right away before the caulk dries. How to Fill Nail Holes in Trim - The Spruce Scoop up a small amount of filler with the edge of the knife, press the filler into the hole, and smooth off the top to remove excess. Tip Close the lid on the wood filler between applications, as filler hardens quickly. Even a minute or two is enough for the filler to begin to develop a dry skin on top. Sand With Your Finger
How to fill gaps in crown molding. metrie.com › thefinishedspace › cabinet-crown-molding13 Kitchen Cabinet Crown Moulding Ideas - The Finished Space Apr 28, 2021 · It helps draw the eye upwards while adding an element of elegance to your kitchen. Traditional crown moulding is usually applied on the top of cabinets or on the ceiling right above them. Crown moulding helps make homes feel more upscale and classic, so make sure it’s a fit for your aesthetic before installing. 2. Stepped Crown How To Properly Install Crown Molding - MSN Lowes recommends touching up any raw edges with a light coat of finish. If you notice nail holes, you can always use wood putty or caulk to fill them in. For gaps, don't hesitate to apply caulk... › Cut-Crown-Molding-Inside-CornersHow to Cut Crown Molding Inside Corners: 15 Steps ... - wikiHow Aug 29, 2022 · Use a file to remove the smaller sections near the face of the crown molding. With most of the wood behind the crown molding gone, there is still going to be 1–5 millimetres (0.039–0.197 in) of wood that you can’t accurately remove with your coping saw. To remove this wood, place a file underneath your crown molding. › how-to-install-shoe-moldingHow to Install Quarter-Round or Shoe Molding Trim - The Spruce Jun 26, 2022 · If you are beginning with a piece that will fit an outside corner, such as around a post or wall arch, you can position the piece of molding across the wall and mark the ends of the molding with a pencil at the wall intersection. If you are installing base shoe molding, make sure that the long edge of the molding is upright against the wall.
How to Install Crown Molding - The Spruce Because walls and ceilings are rarely perfectly flat, it's normal to see some occasional gaps between the molding and the walls and ceiling. Run a bead of flexible, paintable caulk along these gaps to fill them. Caulk can also fill any remaining gaps at the mitered corners. How to Fill Large Gaps in Wood Trim: 7-Step Repair Guide 24.09.2021 · There’s no denying the charm of wood trim. Crown molding, baseboards, window and door frames, mantels, and other millwork can add warmth, character, and definition to any space.. But like any home improvement, precision is key. If there are gaps between where the connecting pieces of wood trim come together — such as between the baseboards and the … › project › how-to-installHow To Cut and Install Crown Molding - Family Handyman Dec 30, 2020 · Every time you cut a miter (whether for coping or outside corners), you'll set the crown molding upside down against the saw's fence. It's easy to get confused and cut the angle backward. To avoid mishaps, hold the crown molding up to the corner and draw a slash showing the direction of the cut. Clamp the crown molding to the work surface. How to Install Crown Molding On Kitchen Cabinets? Step-by-Step Guide to Install Crown Molding: Step#1 Start working with the front of the cabinet. Measure the length of the cabinet and select the molding that is lengthier than the cabinet's length. Step#2 Adjust your miter saw at a 45-degree angle and cut one side of the molding with it. Step#3
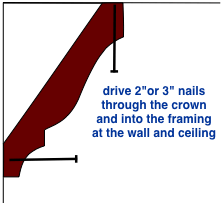
How To Cut and Install Crown Molding - Family Handyman 30.12.2020 · Crown Molding Installation. Crown molding can be intimidating, because walls often aren’t flat and nailing is difficult. This three-piece system solves those problems. In this article, we’ll show you how to install trim on the walls and ceiling first, then add the crown.. The built-up type of crown molding we chose for this project combines standard crown molding … How To Properly Install Crown Molding - HouseDigest.com When cutting your crown molding, ensure the ceiling edge is flat against the bottom of the miter box. If you have issues with the alignment, you can always turn the molding upside down and try again. Make sure you're cutting close to the end of the crown molding piece. 5. Cut crown molding. crown molding cutting how-to - Designs by Studio C Start by using the Angle Finder tool (the grey tool) to find the spring angle of the molding. The three common spring angles are 38°, 45°, and 52°. (The crown we purchased was 38°). There is also an adjustment nut on the bottom of the Crown Pro jig to set it at the same spring angle as the molding. What Is Scribe Molding? (And Why Your Cabinets May Need It!) Scribe molding is a thin, flexible strip of wooden molding that is attached to the top or side of cabinets. It adds the finishing touch by hiding any gaps or uneven surfaces between the cabinets and the wall or ceiling. Scribe molding is commonly used on cabinets that are mounted on brick, stone, or cinderblock walls.
How to Install Crown Molding - Do-it-yourself-help.com
CROWN MOLDING: Put These Five Tips Into Practice ... - Baileylineroad Paint-grade crown allows the use of latex caulking to fill gaps invisibly before painting, so a tight fit on joints is much less critical than with stained trim. No filling is possible with stained trim of any kind, so you've got to be spot-on with all joints. Cost of materials is another issue.

A Quick Guide to Cutting Crown Molding Using a Jig
Types of Moldings for Cabinets Corner Molding. Corner molding is used to cover an unfinished edge or a gap where two panels or pieces of material meet at a 90 degree angle. Outside Corner Molding is used to cap the raw edge of material visible on an exterior corner. Inside Corner Molding is used to cover any gaps where two pieces of material meet on an interior corner.

Crown molding installation tutorial from Thrifty Decor Chick
How to Install Quarter-Round or Shoe Molding Trim - The Spruce 26.06.2022 · A return is a small piece of molding that neatly finishes off the end of a piece of quarter-round or shoe molding where it ends without turning another corner. It is not necessary to cut a return, but it is an extra finishing touch that makes your work look more professional since it hides the end grain that would be exposed if you cut the trim off straight on the end.
Fixing crown molding seems/gaps??? : DIY
How to Add Crown Molding to Kitchen Cabinets | Abby Organizes Fortunately my chop saw is pre-notched for 22.5 degrees as well as 45 degrees. Make sure to use wood glue on the corners or anywhere two pieces come together. If you skip this part, the joints will tend to pull apart over time. I now had a nice flat header above my cabinets with a tiny gap at the top.
How to Put Up Crown Molding on an Uneven Ceiling | eHow
How to Cut Crown Molding Inside Corners: 15 Steps (with Pictures) 29.08.2022 · Use a file to remove the smaller sections near the face of the crown molding. With most of the wood behind the crown molding gone, there is still going to be 1–5 millimetres (0.039–0.197 in) of wood that you can’t accurately remove with your coping saw. To remove this wood, place a file underneath your crown molding.

d i y d e s i g n: Cutting and Installing Crown Molding
13 Kitchen Cabinet Crown Moulding Ideas - The Finished Space 28.04.2021 · It helps draw the eye upwards while adding an element of elegance to your kitchen. Traditional crown moulding is usually applied on the top of cabinets or on the ceiling right above them. Crown moulding helps make homes feel more upscale and classic, so make sure it’s a fit for your aesthetic before installing. 2. Stepped Crown

d i y d e s i g n: Cutting and Installing Crown Molding
Today's Homeowner Radio Show | May 14, 2022 Filling Gaps in Crown Molding Changing temperatures in the attic can cause crown molding to swell and contract. (David Shao/Getty Images) The crown molding in Judy McLeod's Mississippi home once enhanced the room — now, it's separating from the ceiling and the result is an eyesore.

Adding Moldings to your Kitchen Cabinets - Remodelando la Casa
Install Kitchen Cabinet Crown Moulding | Lowe's 14.03.2022 · Use drywall repair patch to fill nail holes and any gaps at the corners. The patch material we used goes on pink and turns white when it dries. Use a 320-grit sanding sponge to smooth the patched areas. Apply two coats of paint to match the cabinet finish.
How To Remove Old Caulk From Crown Moulding - HOWOTRMEVO
Moulding And Trim With Wood Ceiling Beams - The Finished Space To do this, you have to use a miter saw and cut the moulding at a forty five degree angle across the face (or width) of the crown in each direction. For the left side you'll miter left keeping the left piece and for the right side you'll miter right keeping the right piece.

d i y d e s i g n: Cutting and Installing Crown Molding
Cost to Install Trim: Quarter Round, Base & Shoe Molding 28.03.2022 · Quarter-round molding costs start at about $0.50 per foot, with eight feet being the most common length. It’s so-named because it’s shaped like one-fourth of a circle. The uses of quarter-round molding are generally similar to those of shoe molding, such as covering up the edge of flooring remodel work. Cost to Install Base Molding
How to Install Crown Molding (Quick Guide with Pictures) - One Project ...
How to Install Crown Molding Lighting - Better Homes & Gardens 1 Masking tape 1 Nails or screws 1 Electrical outlet box Instructions Paint And Cut Crown Molding Prime and paint a white top coat on one side of the 2x6 lumber that you'll use for the nailing strips. Apply an identical finish to the back of the crown molding. Tilt your table saw blade to match the spring angle of your crown molding.

How to Fix Gaps in Crown Molding - Sawdust Girl®
upgradedhome.com › what-is-scribe-moldingWhat Is Scribe Molding? (And Why Your Cabinets May Need It!) Scribe molding is a thin, flexible strip of wooden molding that is attached to the top or side of cabinets. It adds the finishing touch by hiding any gaps or uneven surfaces between the cabinets and the wall or ceiling. Scribe molding is commonly used on cabinets that are mounted on brick, stone, or cinderblock walls.

Kitchen Cabinets With Crown Molding
How To Fix Crown Molding Dog Chewed | Find Out Here | All Animals Faq To fix it, simply sand it down. Then, apply a fresh coat of stain. If the wood is clear, you should use a wood filler. For small holes, you can apply a putty knife or use a putty stick. For larger holes, you can use epoxy filler. After the dog has gnawed your crown molding, you can apply a coat of wood filler. This product is made of wood fiber ...
Trim, Fillers, & Molding
How to Install Crown Molding - Angi Use a caulk gun to seal the top and bottom edge of the molding, fill in any gaps in the corners or scarf joints, and to fill in nail holes. Wipe away excess caulk with a rag or your fingertip for a smooth finish. Inspect the boards and apply touch up paint over nail holes or to fill in any visible bare spots. Tips When Buying Crown Molding

Easy Inexpensive Crown Molding Wall Shelf : 6 Steps (with Pictures ...
How to Repair Shrinking Crown Molding - Fine Homebuilding It's about a 40-ft. run of crown, so there are two joints in the run. Once the heating season arrived, the lower indoor humidity caused the molding to shrink along its length, resulting in some ugly open joints (yeah, I know the molding is installed upside down). I've tried reapplying the caulk, and using a more elastic caulking (Big ...
0 Response to "42 how to fill gaps in crown molding"
Post a Comment